Timelapser

A straightforward Windows app for recording screen timelapses.

Timelapser is a practical way to record long sessions in 3D, design, coding, and other screen-based work. Choose a display or draw a region, set the interval, and leave it running while you work.

Download Timelapser

Portable Windows build. No installer or account.

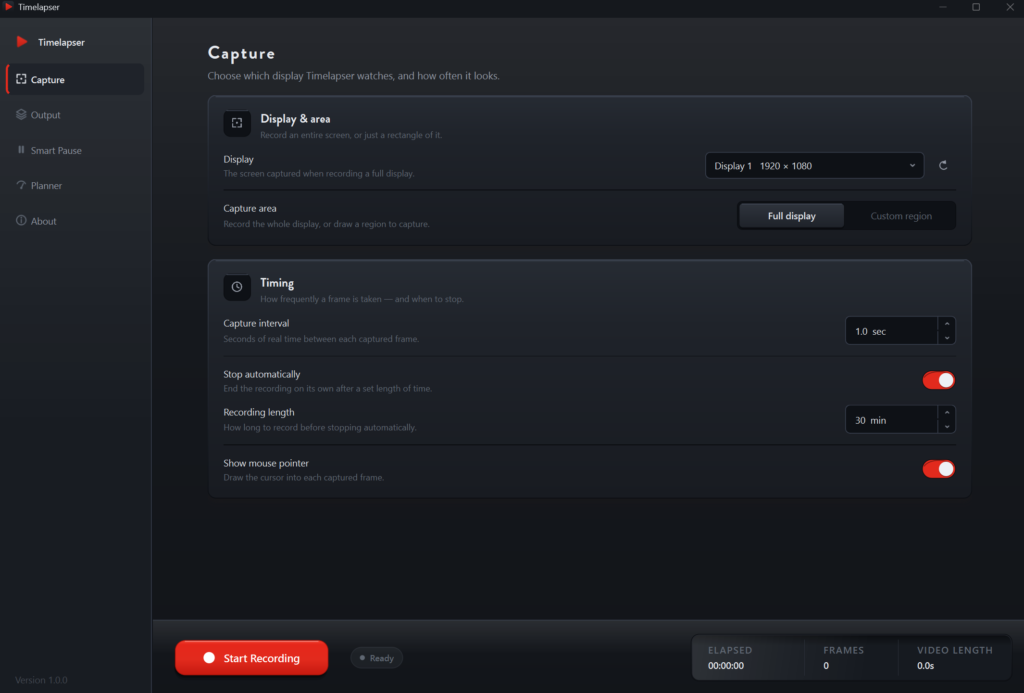
Timelapser Capture page - choose a display or region and set the capture interval, with the record control deck below
Choose a display or region, then set the interval and recording options.
Timelapser Output page - save an MP4 video and JPEG frames, with quality and save-location options
Choose MP4, JPEG frames, or both, then set the frame rate, quality, and save location.
Timelapser Video Planner - forecast video length, total frames, speed-up and file size before recording
The planner can calculate forward from your settings or work backwards from a target video length.

What it does

Timelapser captures a frame at the interval you choose and builds the result when you stop. Save an MP4, the original JPEG frames, or both.

  • Capture a full display or a custom region
  • Set any capture interval from 0.1 seconds to one hour
  • Pause after a chosen period with no keyboard or mouse input
  • Calculate the interval, length, frame count, speed-up, and file size
  • Save an MP4, JPEG frames, or both
  • Start and stop with a global hotkey (F9)
  • See elapsed time, frame count, and estimated video length while recording
  • Keep the app available from the system tray

Features

Display or Region

Capture one display or draw a precise rectangle across your screens.

Pick a monitor from the list. If you plug in or unplug a display, the refresh button re-scans for it.

To record a smaller area, choose Custom region. Every screen dims and you drag out the rectangle you want — on one monitor, or across several. The size and position appear next to a thumbnail that updates every second and a half, so you can check the framing before you start.

Smart Pause

Stops adding frames after a set period with no keyboard or mouse input.

On by default, set to 30 seconds. Step away for that long and Timelapser stops adding frames. Touch the keyboard or mouse and it picks straight back up.

You can set the wait anywhere from 5 seconds to an hour. Paused time doesn’t count towards the recording length, so a 15-minute recording still gives you 15 minutes of real activity. A long render or a coffee break won’t pad it out.

Video Planner

Works out the interval, frame count, speed-up, video length, and estimated size.

The planner works two ways. Tell it your settings and it shows what you’ll get. Or tell it how long the finished video should be, and it works out the interval to use.

Either way you see the length, frame count, speed-up and file size before recording anything, worked out from your actual resolution and quality. One click applies the plan to your settings. Four presets get you started: 4 seconds for art and design, 2 for coding and writing, 15 for long renders, 1 for short walkthroughs.

Video & Stills

Save an MP4, the captured JPEG frames, or both.

You get an MP4 by default. Switch on stills as well and every frame is saved as a numbered JPEG too. One of the two is always on.

Stills come in four quality levels — Compact, Balanced, High and Maximum. That setting only affects the JPEGs, never the video. Each recording goes into its own dated folder, unless you turn on overwrite to keep reusing one.

Timing Control

Set the interval, an optional stop time, frame rate, quality, and cursor visibility.

The interval is how often a frame is taken. It starts at 2 seconds, which suits most screen work. Stretch it out for slower jobs like a long render or build.

Recording runs until you stop it. Switch on the timer and it will stop itself after anything from a minute to a day. Frame rate starts at 30, which looks natural — 60 is smoother. The mouse pointer is drawn into each frame, and you can turn that off.

Tray & Hotkey

Start or stop from the app, system tray, or global F9 shortcut.

F9 starts and stops recording from anywhere in Windows. It works whether the window is in front, behind something else, or hidden completely, and costs nothing while you’re not using it.

The tray icon has a small menu: start or stop, show the window, quit. Its tooltip tells you whether it’s ready or recording, and clicking it brings the window back.

Smart Pause

Smart Pause uses keyboard and mouse inactivity to stop adding frames when you step away. It resumes as soon as there is input again. The delay is adjustable, and the feature can be turned off.

Video Planner

Use Forecast when you know the recording length and interval. Use Plan for a target when you know how long you want the finished video to be. The calculator handles the interval, frame count, speed-up, and estimated file size.

30sVideo length
900Frames
60×Speed-up
20 MBEst. size

How to use

  1. Choose a display or draw the region you want to capture.
  2. Set the interval, output, and optional Smart Pause settings.
  3. Press Record or use F9, then work as usual.
  4. Stop the recording when you are finished.
  5. Timelapser renders the selected outputs to your save folder.

Purpose

I wanted a focused tool for recording process videos without keeping a full screen recording or doing the timing math by hand.

Download

The current build is portable for Windows: extract it and run Timelapser.exe. It does not require an installer or account.

Specifications
Platform
Windows. Portable — extract and run, with no installer and no account.
Video output
MP4, falling back to AVI if the MP4 encoder is unavailable.
Still output
Numbered JPEG frames at four quality presets.
Capture interval
0.1 seconds to 1 hour.
Recording length
1 minute to 24 hours, or unlimited until stopped.
Frame rate
1 to 120 fps.
Displays
Multi-monitor and mixed-resolution aware; regions may span displays.
Download Timelapser

Recordings are stored in dated folders inside the save location you choose.

BAKAR